Building a Custom Link Shortener
A while ago I would use a link shortener fairly regularly, both for personal use to make links and resources a bit easier to share, and for my business to make invoices/proposals/contracts/reports/etc in a standard format (finance.mysite.com/name-INV0010 was much nicer to send through in an email).
Then a few years ago, I came across 1y, a template built using Eleventy, at that point hosted on Netlify and taking advantage of their redirect system to facilitate a simple link shortener with the ability to easily use your own domain. Since then the original project has been updated to allow using other hosting providers, but I’ve made some of my own tweaks to my setup to make things a bit easier for what I’m using it for.
All the code for my setup is available on GitHub (amykapernick/1y), as well as the original version (nhoizey/1y), but read on if you want to know more about how it all works.
Redirect Data
Originally the project created redirects with a folder of markdown files, storing the redirect data in the markdown frontmatter.
---
slug: speaking/resources
url: https://kaperscrewe.notion.site/Speaking-Resources-ac3378daafeb4bdcace6b7d678781418?pvs=4
---
This works just fine, but in an effort to clean the data up a little, I changed it to instead use a single json file. This also allowed me to add an item for the domain name, so I could change it in one place and reference it elsewhere.
{
  "domain": "https://kapers.dev",
  "redirects": [
    ...,
    {
      "slug": "speaking/resources",
      "url": "https://kaperscrewe.notion.site/Speaking-Resources-ac3378daafeb4bdcace6b7d678781418?pvs=4"
    }
  ]
}
Netlify Redirects
The way Netlify lets you define any redirects for your site, with a _redirects file in the below format, makes it really easy to auto generate redirects for each of my URLs. Defining first my slug as the URL on the “site” I want redirected, then where to send it to and lastly setting the status code to 302 (I don’t want a permanent redirect, because I regularly change some of the short URLs).
# Auto-generated Redirects
# /{slug} {url} 302
/speaking/resources https://kaperscrewe.notion.site/Speaking-Resources-ac3378daafeb4bdcace6b7d678781418?pvs=4 302

# Homepage Redirect
/ https://amyskapers.dev 302

# Catch AllHomepageRedirecthttps
/* /404 302
To make things a bit nicer I can also add a redirect to my website so I don’t need a landing page, and lastly add a redirection to a 404 page for anything that hasn’t been caught by an earlier redirect.
Generating the redirect file
Eleventy has a bunch of different templating languages and data formats you can use, I generally use Nunjucks and a combination of markdown, and json/JavaScript data files. I already have the file of redirect data in the _data/urls.json file, so that can easily be loaded in as global data.
At the top of the template, the permalink for the generated file can be set, in this case it’ll be _redirects, and this doesn’t depend on the name/location of the template file at all, it can be anything. Then we loop through the redirect data from the data file, and spit it out in the correct format (/{slug} {url} 302).
---
permalink: _redirects
---

{%- for url in urls.redirects -%}
/{{ url.slug }} {{ url.url | safe }} 302
{% endfor %}

# Homepage Redirect
/ https://amyskapers.dev 302

# Catch AllHomepageRedirecthttps
/* /404 302
At the end of the file, any additional redirects (eg. homepage, 404) can be added.
Editing the Data
In theory this works, but we can make it easier to edit the redirect urls using Decap CMS (formerly Netlify CMS), and this means that anyone (ie. my partner) can edit them without needing access to GitHub (or needing a GitHub account in his case).
Decap CMS takes the config from the admin/config.yml file, and we can generate this using Nunjucks as well. There’s great documentation on the configuration options, but the main points are we can setup a file (site/_data/urls.json) that has two fields, one for the domain (this is hidden and not editable via the UI, just to have it accessible) and another repeating to take the redirects (each of which has a slug and a url field).
---
permalink: admin/config.yml
---
...

collections:
  - name: redirect_urls
    label: Redirect URLs
    label_singular: Redirect URL
    files:
      - label: "Redirect URLs"
        name: urls
        file: "site/_data/urls.json"
        fields:
          - name: domain
            widget: hidden
            default: 'https://kapers.dev'
          - label: Redirects
            name: redirects
            widget: list
            fields:
              - label: Slug
                name: slug
                widget: string
              - label: Redirect URL
                name: url
                widget: string
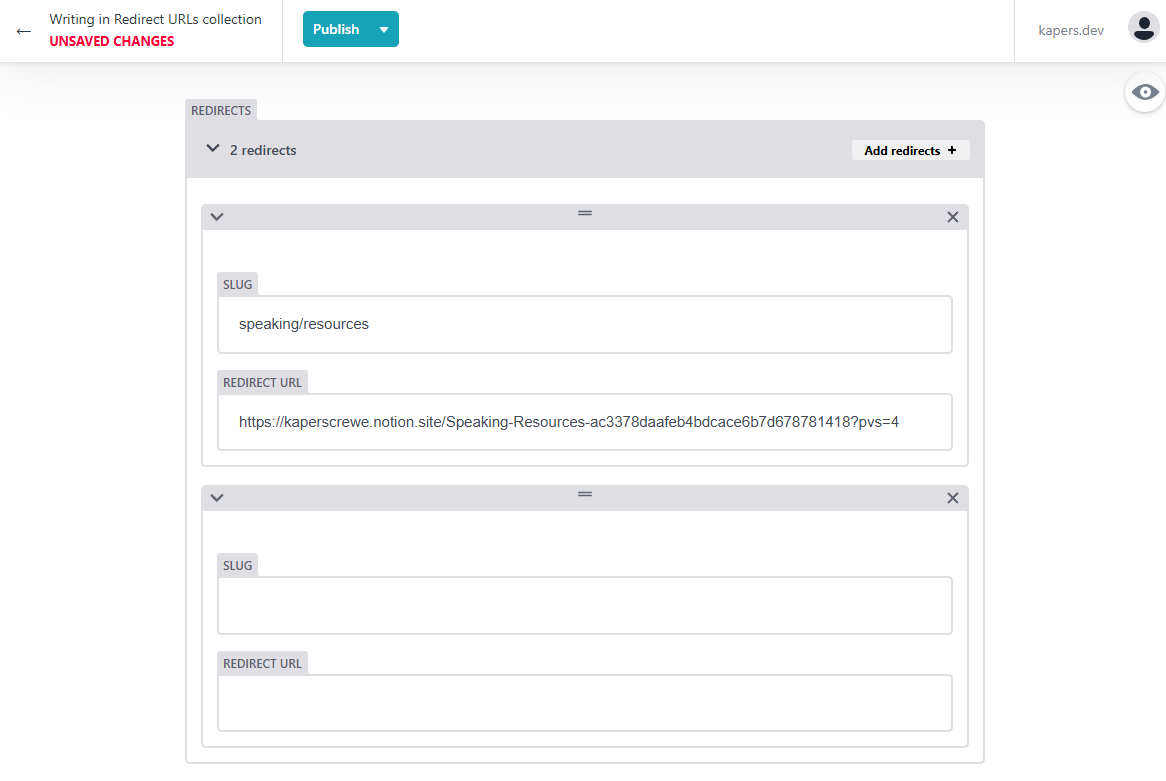
This then gives a nice UI (at {site.com}/admin) where the redirects can be added/edited by anyone (that has login access).
Generating QR Codes
I don’t generally use QR codes, but they can be useful (we’ve just used them for home organisation, which I’ll likely write more about soon), so next I added a GitHub Actions workflow to generate QR codes for each of the shortened URLs (more on building a GitHub Actions workflow here - Front End Testing with GitHub Actions).
Using a shell script, I was able to pull in the redirects (and domain) from the data file, check if a QR code already exists (even if the destination changed, the QR code would be for the short URL and therefore stayed the same), if not it uses the qrcode CLI tool to generate a QR code and save it as a SVG, along with the rest of the images.
data=$(cat ./site/_data/urls.json)
domain=$(echo $data | jq -r '.domain')
redirects=$(echo $data | jq -r '.redirects')

for redirect in $(echo "${redirects}" | jq -r '.[] | @base64'); do
    slug=$(echo ${redirect} | base64 --decode | jq -r '.slug')
    url=$(echo ${redirect} | base64 --decode | jq -r '.url')

    if [ -f "site/src/img/qr_codes/${slug}.svg" ]; then
        echo "QR code for ${slug} already exists"
        continue
    fi

    npx qrcode "${domain}/${slug}" -t svg -q 1 -o "site/src/img/qr_codes/${slug}.svg"
done
We can then run that shell script as part of the workflow, then add and commit the new generated files to the GitHub repo so they don’t need to be generated every time. Just in case the QR code generation fails, we want to continue with the other steps as well, so setting continue-on-error: true will allow it to keep going even if some of the QR codes don’t work.
name: Generate QR Codes & Build Site

on:
  push:
    branches:
      - prod

jobs:
  generate:
    runs-on: ubuntu-22.04
    steps:
      - uses: actions/checkout@v4
      - uses: actions/setup-node@v4
        with:
          node-version: "20"

      - name: Generate QR Codes
        run: .GitHub/actions/qrcode.sh

      - name: Set up git
        continue-on-error: true
        run: |
          git config --global user.name "${{ GitHub.actor }}"
          git config --global user.email "${{ GitHub.actor }}@users.noreply.GitHub.com"

      - run: git add -A && git commit -m "Generated new QR Codes"
        continue-on-error: true

      - name: Push changes
        continue-on-error: true
        env:
          GH_TOKEN: ${{ secrets.GITHUB_TOKEN }}
        run: git push
Because we’re making changes to the repo by adding generated QR codes, I want to manage the building and deploying of the website in the same workflow rather than deploying automatically to Netlify, that way we can avoid duplicate deploys (ie. when a URL gets added it’ll trigger a build, then when the workflow generates the QR code Netlify will trigger another build from the commit). Using the action-netlify-cli action we can build and deploy from the workflow, again continuing even if something has failed earlier.
name: Generate QR Codes & Build Site

...

    steps:
      ...

      - run: npm install
        continue-on-error: true

      - name: Publish
        uses: South-Paw/action-netlify-cli@v2
        id: netlify
        continue-on-error: true
        with:
          args: "deploy --build --json --prod"
        env:
          NETLIFY_AUTH_TOKEN: ${{ secrets.NETLIFY_TOKEN }}
          NETLIFY_SITE_ID: ${{ secrets.SITE_ID }}
Publishing the QR Codes
To make it easier to access/find the QR codes, I want to publish them along with my “site”, I can directly copy the images folder to the built site, or in this case copying everything inside the site/src folder (in my case images, CSS and fonts) into the root of the built site. This means that I’ll be able to access a generated QR code at {site.com}/img/qr_codes/{slug}.svg.
module.exports = (eleventyConfig) => {
    eleventyConfig.addPassthroughCopy({ "site/src": "." });

    return {
        dir: {
            input: "site",
        },
    }
};
Updating the CMS Preview
Now that the QR codes are being generated, it’d be nice to see things a bit more in the preview of the CMS, so I can add some customisation. Inside the template for the admin file (without a permalink admin/index.njk will be rebuilt to admin/index.HTML), I can register a custom CSS file for the CMS preview pane.
<!doctype HTML>
<HTML>

<head>
    <meta charset="utf-8" />
    <meta name="viewport" content="width=device-width, initial-scale=1.0" />
    <title>Content Manager</title>
</head>

<body>
    <script src="https://unpkg.com/decap-cms@^3.0.0/dist/decap-cms.js"></script>
    <script>
        CMS.registerPreviewStyle("/styles/preview.css");
    </script>
</body>

</HTML>

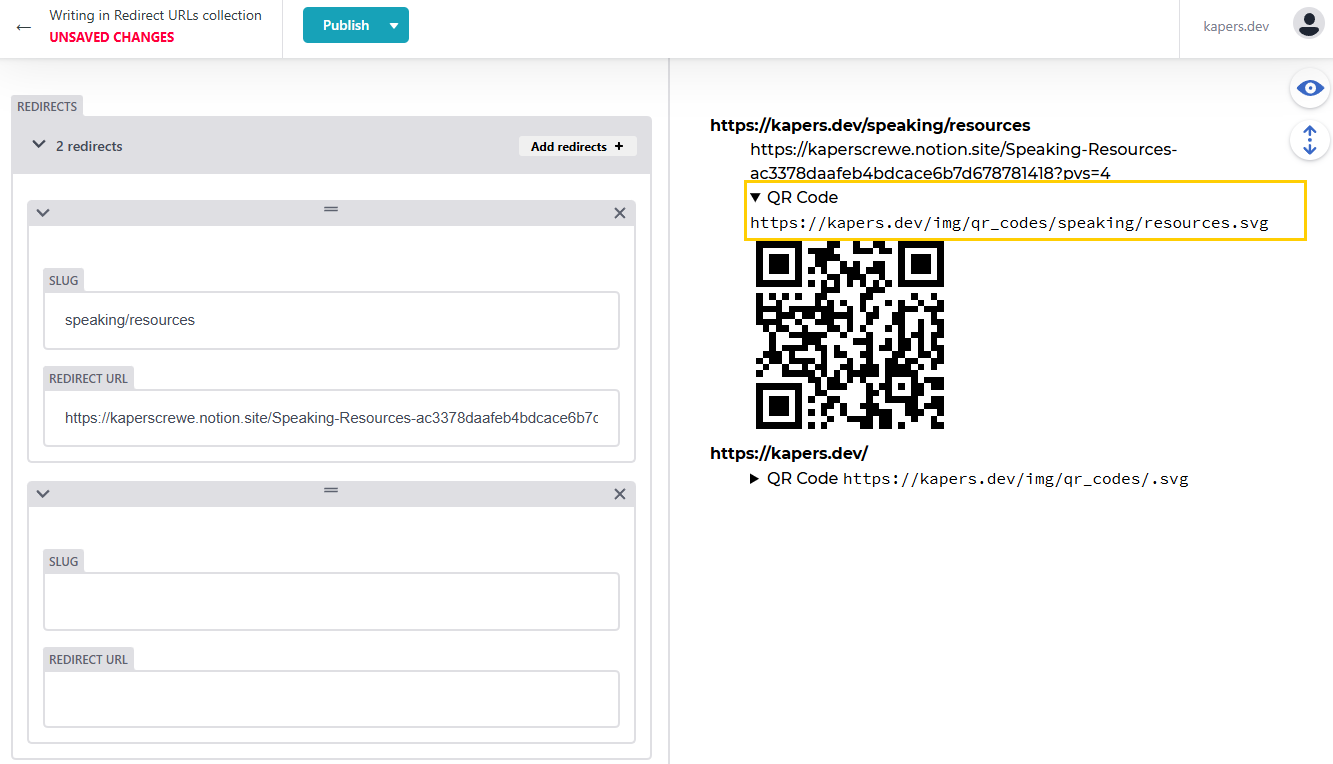
To create a custom preview as well as adding the styles, we can create a custom React component to display the shortened URL, destination URL and the generated QR code. While this is a bit of a clunky way to render it out, I couldn’t get it to work the other way and this was a relatively simple preview (also the documentation is fairly lacking when it comes to what you’re actually doing here).
const RedirectsPreview = createClass({
    render: function () {
        const siteUrl = this.props.entry.getIn(['data', 'domain'])

        return h('dl', {
            class: 'preview_urls'
        },
            this.props.widgetsFor('redirects').map((redirect, index) => {
                return h('div', { key: index },
                    h('dt',
                        {},
                        siteUrl, '/', redirect.getIn(['data', 'slug']),
                    ),
                    h('dd',
                        {},
                        redirect.getIn(['data', 'url']),
                        h('details', {},
                            h('summary', {},
                                'QR Code ',
                                h('code', {},
                                    'https://kapers.dev/img/qr_codes/',
                                    redirect.getIn(['data', 'slug']),
                                    '.svg'
                                )
                            ),
                            h('a', {
                                href: `https://kapers.dev/img/qr_codes/${redirect.getIn(['data', 'slug'])}.svg`,
                                download: `qr_${redirect.getIn(['data', 'slug'])}.svg`
                            },
                                h('span', {style: {display: 'none'}}, 'Download QR Code'),
                                h('img', {
                                    src: `https://kapers.dev/img/qr_codes/${redirect.getIn(['data', 'slug'])}.svg`,
                                    alt: ""
                                })
                            ),
                        )
                    )
                )
            })
        )
    }
})

CMS.registerPreviewTemplate('urls', RedirectsPreview)
The custom preview template will loop through and generate the following HTML for each shortened URL.
<div>
    <dt>{domain}/{slug}</dt>
    <dd>
        {url}
        <details>
            <summary>QR Code <code>{domain}/img/qr_codes/{slug}.svg</code></summary>
            <a
                href="{domain}/img/qr_codes/{slug}.svg"
                download="{slug}.svg"
            >
                <span style="display: none;">Download QR Code</span>
                <img
                    src="{domain}/img/qr_codes/{slug}.svg"
                    width="200"
                    height="200"
                    alt=""
                />
            </a>
        </details>
    </dd>
</div>
Which then gives us a nicer view of what different URLs we’ve got, as well as linking through to the QR codes for easy access (in a collapsible section so it doesn’t take up a heap of room on the page).
Caveats
While this is a pretty good system there’s a few minor things that I’d love to improve when I have the time.
QR Codes take time to generate
The preview in the CMS will update straight away, but the QR code won’t necessarily have updated yet so the image will fail to load. It’s not a big deal, the workflow takes under a minute to run, build and deploy the site so waiting a second and refreshing the page will get the QR code, but it’d be nice to add in generating QR codes on the fly for when they’re not there yet. The qrcode package can also be used as a JavaScript package so it wouldn’t take too much to implement this.
Nested URLs break QR code generation
While nested redirects work fine, eg. /speaking/resources, and technically the QR code generation works fine (is saved in img/qr_codes/speaking/resources.svg), the CLI tool doesn’t have permission to create a new directory (only to create new files) so if the subdirectory doesn’t exist the generation will fail. It shouldn’t take too much to adjust the shell script to work out if image will need a directory to be created first and generate it before the QR code gets generated, but again I haven’t had the chance yet.
So next time you go to generate a shortened URL, have a think, should you use bitly (or whatever other tool you use) or should you create your own (from a pre-existing template).